Setting up DMARC, SPF, DKIM with Amazon SES
In this article
Note: This article only applies if you have integrated Amazon SES with your EmailOctopus Connect account. For instructions on how to set up DMARC, SPF and DKIM in EmailOctopus, read this article.
SPF, DKIM, and DMARC control which servers can send as your domain (SPF), authenticate a message, proving that you sent it (DKIM), and instruct recipients what to do if one or both of those checks fail (DMARC)
How to verify your domains
The instructions below are a walkthrough on how to add SPF, DKIM and DMARC to your Amazon SES account (which will then be picked up by EmailOctopus).
In this process there will be significant changes made to your DNS settings, we’d advise that you take great care and have sufficient technical knowledge to make these changes. It’s well worth familiarising yourself with how to make DNS changes before starting this guide. We also recommend keeping your DNS tab/window open, throughout the walkthrough.
Verifying a new domain (DKIM)
First, log in to your AWS dashboard and navigate to the Verified Identities. Click on the orange "Create Identity" button.
On the next page, check the box to add a domain, type down your domain address inside the text box, scroll down, and click the orange button labelled "Create Identity".

Scroll down to see all CNAME records that you have to add to your DNS entries (NOTE: values will be different than those in the screenshot below).

Upon returning to the Verified Identities screen your domain should be listed as Verification pending.
Applying records
You will need to add those records to your Domain Name System (DNS). Instructions on how to do this for a few popular DNS providers are below.
Often, the DNS is hosted with the same company that provided your domain name. If you're unsure where you need to edit your DNS, you can check it on this website – just type your domain name, click "search" and scroll down to "Name Servers".

The value you see there should indicate which service is responsible for your DNS. In the example above it's Cloudflare.
Once Amazon has completed verifying your domain, they’ll send you an email notifying you of the success. This should take less than 5 minutes.

Setting up a custom mail from domain (MX and SPF)
Next up, we recommend you set up a custom Mail From domain, as it improves delivery. This will allow Amazon SES to mark emails as “coming from” your domain rather than from Amazon. To take advantage of this benefit, you'd have to make sure that you use from addresses on the main domain in your emails.
- Click on your verified domain in the SES domain dashboard.
- Click on the Edit button in the upper-left corner of the 'Custom MAIL FROM domain' box.
- Check the box to 'Use a custom MAIL FROM domain' and type a subdomain you wish to use as a 'mail from' domain – it can be anything you want, you don’t need to create that subdomain anywhere upfront.
- Choose your preferred behaviour on MX failure.
- Click the button to 'Save changes'.

Scroll down to see the MX and TXT records you have to add to your domain DNS entries (NOTE, values will be different than those in the screenshot below). Once you've added them to your domain's DNS settings, your subdomain will be created and work as a "mail from" domain.

Once Amazon is able to verify the DNS settings, they will send you an email telling you that it has been successfully verified.
Setting up DMARC
We recommend setting up DMARC on your domain if you send more than 10,000 emails per day (or 5,000 emails to Gmail users).
To do it, you need to add a record to your Domain Name System (DNS), specifying your desired DMARC policy.
So, for instance, for yourdomain.com, you would add the following TXT record:
name: _dmarc.yourdomain.com
value: v=DMARC1; p=none;
If you'd like to learn more about DMARC and the different policies available, read this article.
Optional: setting up DMARC reports
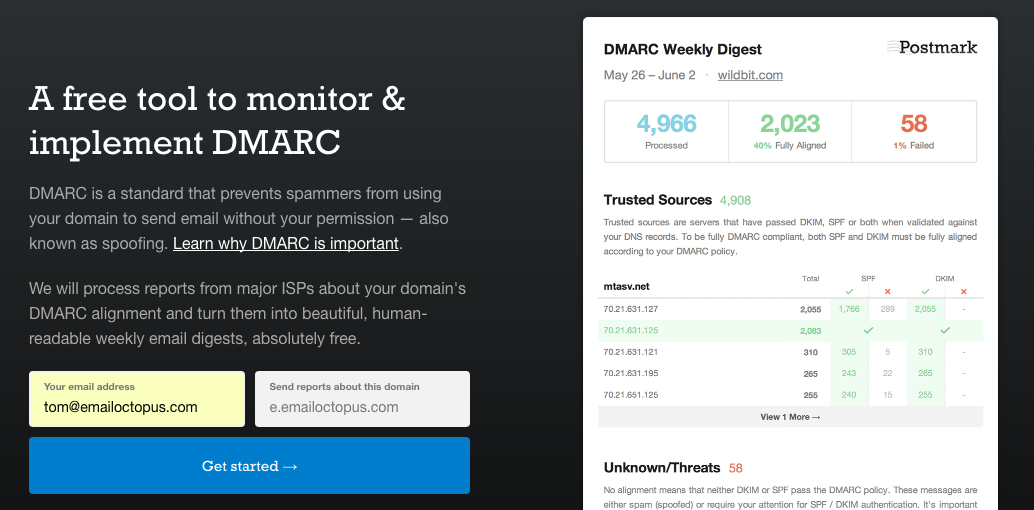
Head to https://dmarc.postmarkapp.com/ to create your free account. This account will receive the daily ISP reports, which will then be sent to you on a weekly basis.
Enter your usual email address to receive your DMARC status reports.
Enter your domain in the "send reports about this domain" field. Our example was e.emailoctopus.com.
Now you should see a screen similar to this:
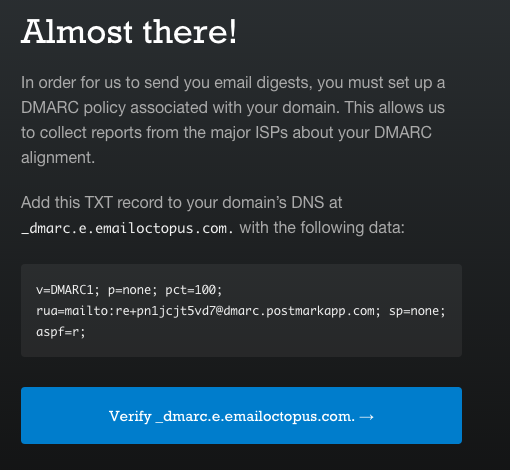
Copy the above DNS records into your DNS provider's settings, and save them.